






ALT_IMG

Tutorials

Featuring short lessons and techniques, covering languages viz. PHP, MySQL, CSS, HTML, JavaScript, Java. The latest methods of developing web applications and basic tutorials of Java technology. You'll find free codes available in the post added with some video tutorials wherever applicable. Readmore...

ALT_IMG

How-To's

There went a rumour about the announcement of the Sony Xperia S and also we have seen some leaked photos of the model many time before. The latest leak photos had Sony Ericsson logo wearing on it but this final product image from CES has a Sony logo on the top Readmore..

Alt img

Tips and Tricks

Sony announces its very first mobile phone ‘Sony Xperia Ion’ in 10 years after it is being seperated from Ericsson at the CES 2012. Now the new products and devices is back with its brand logo of Sony instead of Sony Ericsson. is the first operator to have a Sony phone in the assortment Readmore...

ALT_IMG

Hacking Tricks

In the past few months we saw so many ultrabooks budding up in the electronic market. The Apple’s trendy MacBook Air gave the PC makers a cause to be anxious, since it is obvious that these thin-and-light laptops seems to be in a tough competiton with them. In general, Ultrabooks are the small, light, powerful Readmore...

ALT_IMG

Gadgets

The minute you get your hands on the Droid Xyboard, it is clear that this is a higher-caliber Android tablet while comparing with almost everything else available today. The tablet is sleek, properly balanced and felt comfortable in our hands. A completely new look, significantly enhanced performance and Readmore...

ALT_IMG

Internet Tweaks

There went a rumour about the announcement of the Sony Xperia S and also we have seen some leaked photos of the model many time before. The latest leak photos had Sony Ericsson logo wearing on it but this final product image from CES has a Sony logo on the top Readmore..

ALT_IMG

Tech News

There went a rumour about the announcement of the Sony Xperia S and also we have seen some leaked photos of the model many time before. The latest leak photos had Sony Ericsson logo wearing on it but this final product image from CES has a Sony logo on the top Readmore..

ALT_IMG

Downloads

There went a rumour about the announcement of the Sony Xperia S and also we have seen some leaked photos of the model many time before. The latest leak photos had Sony Ericsson logo wearing on it but this final product image from CES has a Sony logo on the top Readmore..

Showing posts with label internet trick. Show all posts
Friday, 28 December 2012

Google Chrome - Keyboard Shortcuts

0 comments

Access your Google Chrome browser with your keyboard ONLY.
Using keyboard shortcuts often looks cool and the same could be done in your chrome browser too since Google Chrome allows many keyboard shortcuts and using them makes our work more simpler. Checkout!

Shortcuts -

CTRL + N: Open a new window

CTRL + <Link>: Open a link in a new tab

CTRL + SHIFT + N: Open a new window in Incognito Mode

SHIFT + <Link>: Open a link in a new window

CTRL + T: Open a new tab

CTRL + SHIFT + T: Reopen the last tab that you closed

ALT + F4: Close current window

CTRL + 1: Switch to the tab in position 1 on the tab strip

CTRL + 2: Switch to the tab in position 2 on the tab strip

CTRL + 3: Switch to the tab in position 3 on the tab strip

CTRL + 4: Switch to the tab in position 4 on the tab strip

CTRL + 5: Switch to the tab in position 5 on the tab strip

CTRL + 6: Switch to the tab in position 6 on the tab strip

CTRL + 7: Switch to the tab in position 7 on the tab strip

CTRL + 8: Switch to the tab in position 8 on the tab strip

CTRL + 9: Switch to the last tab on the tab strip

CTRL + TAB: Switch to the next tab

CTRL + PAGE DOWN: Switch to the next tab

CTRL + SHIFT + TAB: Switch to the previous tab

CTRL + PAGE UP: Switch to the previous tab

CTRL + W: Close current tab or pop-up window

CTRL + F4: Close current tab or pop-up window

ALT + HOME: Open your home page

CTRL + O: Open a file in the browser

CTRL + H: View Browsing History

CTRL + B: Toggle bookmarks display

CTRL + J: View Downloads

SHIFT + ESC: View Chrome's internal Task Manager

CTRL + P: Print the current page

F5: Reload the current page

ESC: Stop the current page from loading

CTRL + F5: Reload the current page, overriding the cache

SHIFT + F5: Reload the current page, overriding the cache

ALT + <Link>: Download link

CTRL + F: Open the 'Find in page' dialog box

CTRL + G: Find the next match from 'Find in page' box

F3: Find the next match from 'Find in page' box

CTRL + SHIFT + G: Find the previous match from 'Find in page' box

SHIFT + F3: Find the previous match from 'Find in page' box

CTRL + U: View source code of the current page

CTRL + D: Bookmark the current page

CTRL + PLUS: Make text larger

CTRL + MINUS: Make text smaller

CTRL + 0: Return to default text size

BACKSPACE or ALT + LEFT ARROW: Advance to the previous page in your browsing history (for the current tab)

SHIFT + BACKSPACE or ALT + RIGHT ARROW: Advance to the next page in your browsing history (for the current tab)

ALT + E or ALT + F: Open Chrome's "wrench", or tools, menu

CTRL + SHIFT + B: Activate or disable the Bookmarks Bar.

F6 or SHIFT + F6: Advance through active components on the current page, or through items in Chrome's Address bar, Bookmarks bar, or Downloads bar.

CTRL + SHIFT + J: Open Chrome's JavaScript Console.

CTRL + SHIFT + I: Open Chrome's Developer Tools interface.

F1: Open Chrome's Help Center in a new tab or window.

CTRL + SHIFT + DELETE: Open the Clear Browsing Data window.

CTRL + ENTER: Automatically add www. (at the beginning) and .com (at the end) of the text currently residing in the Address (or URL) bar

CTRL + BACKSPACE: Remove whatever key term precedes the active cursor in the Address (or URL) bar

CTRL + L or ALT + D: Highlight the full URL in the Address bar

CTRL + K or CTRL + E: Enters a question mark in the Address bar. Typing a keyword or keywords following this question mark will submit the search term to your default engine.

CTRL + S: Save the current page to your hard drive

CTRL + C: Copy selected text or images to the Clipboard

CTRL + V or SHIFT + INSERT: Paste the current contents of the Clipboard, preserving original formatting

CTRL + SHIFT + V: Paste the current contents of the Clipboard without original formatting


Continue reading →
Thursday, 27 September 2012

How To Use Captcha in HTML Forms

0 comments


HTML forms are the essential needs of almost any website viz. contact us form. A contact us form is very useful as it aids your visitors to communicate easily in a simple way. A simple form, without a captcha on it are the chief look-outs of hackers and spammers. It is essential to secure your form against all 'holes' that those hackers are searching for.


How does the spammers/hackers exploit HTML forms?

1) As a relay for sending bulk unsolicited emails.

If you are not validating your form fields (on the serve side) before sending the emails, then hackers can alter your email headers to send the bulk unsolicited emails. (also known as email injection)


2) For sending spam messages to you.

There are programs known as 'spam-bots' that leech through the web pages looking for web forms. When found, those 'bots' just fills the fields with a spam message and submits. Eventually you will start getting many hundred submissions send by those spam bots and you will find it difficult to separate genuine submissions from spam messages.

The solution for this problem is to use a mechanism to identify human submitters from 'bots'. CAPTCHA is one of such tests.


Adding Captcha


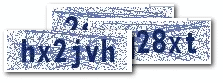
Captcha is an image with a code written on it. The website visitor is required to read the code on the image and enter the value in a text field. If the word entered is wrong, the form submission is not processed. As CAPTCHA is a smartly blurred image, the spam bot can't read it. So the form cannot be auto-submitted by a 'bot'.


Contact form with Captcha


<form method="POST" name="contact_form"
action="<?php echo htmlentities($_SERVER['PHP_SELF']); ?>">
<label for="name">Name: </label>
<input type="text" name="name"
value="<?php echo htmlentities($name) ?>">
<label for="email">Email: </label>
<input type="text" name="email"
value="<?php echo htmlentities($visitor_email) ?>">
<label for="message">Message:</label>
<textarea name="message" rows=8 cols=30>
<?php echo htmlentities($user_message) ?></textarea>
<img src="captcha_code_file.php?rand=<?php echo rand(); ?>"
id="captchaimg" >
<label for="message">Enter the code above here :</label>
<input id="6_letters_code" name="6_letters_code" type="text">
<input type="submit" value="Submit" name="submit">
</form>


The HTML form above contains the fields for name, email and message. In addition, we have the CAPTCHA image. The <img> tag for the CAPTCHA image points to the script captcha_code_file.php. The PHP script in 'captcha_code_file.php' creates the image for the captcha and saves the code in a session variable named '6_letters_code'.


Validating the CAPTCHA


When the form is submitted, we compare the value in the session variable(6_letters_code) with the submitted CAPTCHA code( the value in the text field 6_letters_code). If the codes match, then we proceed with emailing the form submission. Else we display an error.

Here is the code that does the server side processing:


if(isset($_POST['submit']))
{
  if(empty($_SESSION['6_letters_code'] ) ||
    strcasecmp($_SESSION['6_letters_code'], $_POST['6_letters_code']) != 0)
  {
   //Note: the captcha code is compared case insensitively.
   //if you want case sensitive match, update the check above to
   // strcmp()
    $errors .= "\n The captcha code does not match!";
  }
  if(empty($errors))
  {
    //send the email
    $to = $your_email;
    $subject = "New form submission";
    $from = $your_email;
    $ip = isset($_SERVER['REMOTE_ADDR']) ? $_SERVER['REMOTE_ADDR'] : '';
    $body = "A user  $name submitted the contact form:\n".
    "Name: $name\n".
    "Email: $visitor_email \n".
    "Message: \n ".
    "$user_message\n".
    "IP: $ip\n";
    $headers = "From: $from \r\n";
    $headers .= "Reply-To: $visitor_email \r\n";
    mail($to, $subject, $body, $headers);
    header('Location: thank-you.html');
  }
}


Customizing the CAPTCHA

The CAPTCHA script in the sample code download can be customized. If you open the script, you can see the first few lines of the code as shown below:


$image_width = 120;
$image_height = 40;
$characters_on_image = 6;
$font = './monofont.ttf';
//The characters that can be used in the CAPTCHA code.
//avoid confusing characters (l 1 and i for example)
$possible_letters = '23456789bcdfghjkmnpqrstvwxyz';
$random_dots = 0;
$random_lines = 20;
$captcha_text_color = "0x142864";
$captcha_noise_color = "0x142864";


You can change the size of the CAPTCHA by changing $image_width & $image_height. The number of characters in the CAPTCHA can be changed by updating $characters_on_image. Similarly, the text color of the CAPTCHA can be customized by updating $captcha_text_color. The code adds some 'noise' in the image by adding random lines and dots. you can increase or decrease the noise. Please note that increasing the noise may make it difficult for your genuine visitors to read the code.


Screenshot -


Continue reading →
Sunday, 29 July 2012

How To Play LAN Games Using Hamachi

0 comments
In this tutorial I will show you how to play LAN games with your friends using the Hamachi software.


First download Hamachi from hamachi.en.softonic.com and install it.


How to create new network using Hamachi?


There are three icons that show up along the bottom of the rectangular menu. Clicking on the triangular icon opens up the networking menu, where you can join a network if you have the proper information or set one up.
Click on triangular icon -> create new network


Type name of server and password


Click Create

How to join to hamachi network ?

Click on triangular icon – > join existing network


Enter the name and pasword of network that you want to join


How to play counter strike through Hamachi ?

To host a Counter Strike game:

  • Turn off or disable your firewall when you play using hamachi. If you are using the Windows firewall, remember to turn it off from the Control Panel.
  • Run Hamachi. Click the last button and choose Preferences. Then click Window and check the Show “Advanced…” peer menu item checkbox and click OK.


  • You must open ports go to control panel then to windows firewall and exceptions and select hlds then click on add port.


  • In name type CS in port number type port 28010, select UDP , click OK 


  • Run hdls Launcher ( C:\Program Files\Counter-Strike 1.6) , type information as shown below, just use your server name and password, click Start server


For every new player who joins your networks you have to do the following steps:

  • Right click the player’s entry in Hamachi, click Advanced. In the Peer VPN alias box enter the first three parts of your Hamachi IP address (example: 5.109.111) and add the last part of the player’s IP address ( example: .59) so that it makes a new IP address.Click OK and then exit Hamachi. Launch Hamachi again.


  • When you finish that call your friend to join your hamachi network and do not give them ip addres of server (192.168.x.x) give them your hamachi ip then when they want to connect to your server in ther CS console( to run console press ~) type connect 5.101.x.x : your port :28010 and hit enter 


To join a Counter Strike game:

  • Turn off your firewall (or disable it). Remember to turn it back on after you finish playing.Run Counter strike. Press the ~ key on the keyboard. It is to the left of the 1 key on the top row of the keyboard.

         Type connect hamachi ip :port to connect
         For example:


The game will connect and you can start playing.


Continue reading →
Tuesday, 14 February 2012

Benefits of using BCC while sending an Email

0 comments


Almost every user on the Internet sends/receives hundreds of emails per day. However only a handful of them know what is BCC and what are the advantages of using BCC while sending an email. If you are one such Internet user who is unaware of BCC then this is the post that you should definitely read! 


What is BCC?

♦ BCC stands Blind Carbon Copy.
♦ It refers to the practice of sending an email to multiple recipients without disclosing the individual emails addresses. 

♦ While sending the same email/message to multiple recipients, it is a common practice for most users to separate the email addresses by using comma or semi-colon and insert all those addresses in the "To:" field. When emails are sent in this way, each receiver is able to see the complete list of recipient email addresses to which the same message if being sent to. 

♦ Unlike "To:", the "BCC:" option allows you to hide the recipients in email messages. In other words, when emails are sent using "BCC:", the receiver will not be able to see the list of recipient email addresses. Thus using BCC is a smart way to protect the privacy of the recipients.


Why should you use BCC?

Here are the reasons for using BCC - 

Privacy – BCC provides an easy and simple option for protecting the privacy of your recipients. Under many circumstances it is necessary for us to send an email without letting the recipients know who else is receiving the same message. Also it is highly recommended that you use the BCC: while forwarding a joke or a funny email to a list of your friends. If you are sending email on behalf of a business or organization, it may be especially important to keep lists of clients, members, or associates confidential. So don’t forget to use BCC: in instances wherever privacy matters.

Respect for you recipients - While forwarding email messages, people often do not bother to remove the list of previous recipients. As a result, messages that are repeatedly sent to many recipients may contain long lists of email addresses. This makes it easy for the spammers to collect and target those emails for spamming.

In order to avoid the risk of spammers, it is necessary that you encourage people/friends to use BCC: while forwarding any message to you. This prevents your email address from appearing in other people’s inboxes thereby keeping yourself less exposed to spammers.


How to use BCC?


Most email clients(gmail, yahoomail, hotmail) provide the BCC: option under a few lines below the To: field. All you have to do is just enter the list of recipients in the BCC: field instead of entering in the To: field. You may enter only your own email address in the To: field. Once you do this just hit the Send button.


Continue reading →

How to Activate new Google Navigational Bar

0 comments
Everyday Google is experimenting and making changes in different things like Google's doodle or services as Youtube, Reader, GMail and now the latest update is the navigation bar or as it is known, "Google Bar". This change adds up a navigation bar from top to the left hand side of your browser window. Through this change the appearance of the Google page look cool and much more attractive & simple to navigate to other Google services.


Before starting with the activation of the navigation bar, it is important to know that this tutorial only works bearing accounts or service in the English language (U.S.) i.e. to make change, we need to have Google+ accounts, Gmail, Reader in that language and having a Google Chrome Browser. Once said that, here are the steps:

1) You’ll have to download and install the free extension called as Edit This Cookie for Google Chrome.

2) Once installed, go to Google homepage (i.e. www.google.com) since as said before the change is only available with English language, hence this won’t work for many countries like, google.it, google.de, etc. 

3) You’ll see a Cookie on the omnibar or top-right corner of your browser (refer screenshot).


4) Navigate to the PREF section, and change its value with:

ID=03fd476a699d6487:U=88e8716486ff1e5d:FF=0:LD=en:CR=2:TM=1322688084:LM=1322688085:S=McEsyvcXKMiVfGds

Apply your changes and reload the page. You should have now the new Google navigation bar.


Continue reading →